Since there were specific things to be tested and used, I decided not to touch the Windows7 installation on the computer – at least until the end of the testing period.
Gladly, Ubuntu has a very elegant solution to that:
have a Live boot image on a USB flash drive (USB stick)
install the O/S on a USB flash drive
I chose Ubuntu 12.10 (Quantal Quetzal) to test because I did not have chance to play with it yet.
There are two major ways to prepare a USB flash disk for Live boot:
- Windows: Use Pendrivelinux – http://www.pendrivelinux.com/
- Ubuntu: Use “Startup Disk Creator” – /usr/bin/usb-creator-gtk
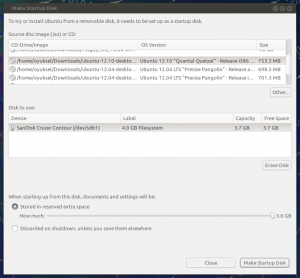
Since I have 12.04 LTS (Precise Pangolin) running on my other laptop, I followed the latter. Here is the main screen of the Startup Disk Creator.
Here I am using a 4GB USB flash disk and will be using all available space for permanent setup. Preparation of USB takes around 30-60 seconds:
Next step is to bootup the UltrabookTM using this USB stick. An important note is that the UH572 is equipped with a Synaptics ClickPad (version 8.0) which is not detected properly with the boot. So, for ease of operation, it is better to attach and external mouse, until we can solve that problem after the whole installation is complete.
Since I am going to install on another external USB flash disk, I need to choose “Try Ubuntu” instead of “Install Ubuntu” directly
After inserting the target USB device, I started installation using the icon on the desktop. During the installation I chose manual partitioning to make sure that I do not touch the UH572’s internal flash drive and any of the Windows7 partitions.
After the installation is complete, I booted the system up using the newly prepared USB flash disk.
Workaround to Get The Touchpad Working
1. open a terminal (Ctrl-Alt-T)
2. run
$ sudo gedit /etc/default/grub (or your favourite editor – I prefer “vim”)
3. find the line containing: GRUB_CMDLINE_LINUX
4. add “i8042.notimeout i8042.nomux” to the string in quotes
5. save and exit
6. run
$ sudo update-grub
7. reboot
This only enables 2-finger vertical and horizontal scrolls where it can be setup through “Mouse and Touchpad” program.
Meanwhile, the website for the Synaptics ClickPad claims that there is support for more. From the website:
“SGS-L is provided free of charge to Synaptics OEM/ODM partners when ordered with Synaptics TouchPad and ClickPad™ products. To find out more about Synaptics Gesture Suite for Linux, please contact your Synaptics sales representative.”
To get more out of the ClickPad I found the following solution:
1. run “sudo apt-get install kde-config-touchpad”
2. run “synaptiks”
and then I could configure the system for two and three finger gestures. Still there does not seem to be support for 4-finger gestures.
After becoming free of the external mouse, I went ahead and installed gnome3 where I will not go into details here. In the following video, you can see my bootup experience with the USB flash memory.

